
Machine Learning Continuous Integration with MLflow
12 Jul 2020 by dzlab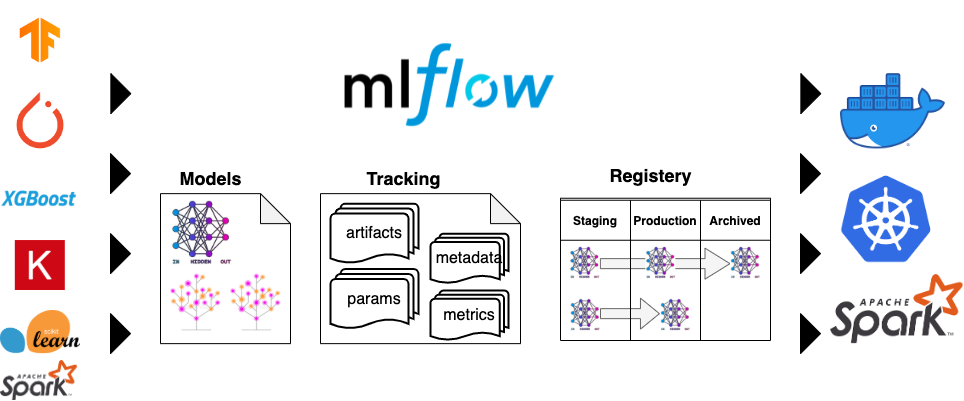
In Software Engineering, Continuous Integration is process that helps a team iterating quickly by integrating changes (small or big) from everyone. Those integrations are usually verified by automated testing, building, and also releasing of the project. Such workflow would usually look like:
1- Code
- Create a new feature branch
- Write code and Manually run tests in a local IDE or terminal
- Commit code to a version controlled code branch
2- Build
- Pull together new code + tests
- Run automated tests
- Build library and non notebook code
3- Release
- Generate a release artifact
In the context of a Machine Learning project, such practice can be used as well but with a slight adaptation of the workflow:
1- Code
- Create a new feature branch
- Write code on Notebook / IDE environment using favorite ML tools: sklearn, SparkML, TF, pytorch, etc.
- Try hyperparameters space search, alternate feature sets, algorithm refinements, etc.
2- Build
- Run training with new model features, hyperparameters, etc.
3- Release
- Generate Model, entire pipeline, plot, code, etc. as artifacts
Though the adaptation is not straighforward as by nature ML projects are experimental and not necessarly deterministic. In your feature branch, you would need a lot of trial to get to something that could eventually be integrated into the main code base.
At scale, this becomes even more complicated and a tool to help track those trails is needed. MLflow is one of such tools. Using MLflow we can:
- Track experiments, runs, hyperparameters, code, artifacts, etc.
- Track different model version in different stages (QA, Production) using Model Registery
Setting up MLflow
For local development mlflow can use local file system to track metrics and store artifacts (by default under root folder ./mlruns). Using the CLI (see documentation) it can be started simply with:
$ mlflow ui
Note that in this case Model Registery will not be available you may not needed for local development. To enable it, we need to start the MLflow tracker server with backend for both artificats and metadata. For example, we could use Azure Blob storage like this
$ pip install azure-storage-blob
export AZURE_STORAGE_CONNECTION_STRING=<connection_string>
export AZURE_STORAGE_ACCESS_KEY=<access_key>

$ mlflow server \
  --backend-store-uri <dialect>+<driver>://<username>:<password>@<host>:<port>/<database> \
  --default-artifact-root wasbs://<container>@<storage-account>.blob.core.windows.net/<path>
For all available backend and artifact storage, check the MLflow documentation.
To use MLflow in a real project, you would want to self-host it or use it as part of Databricks on Azure.
Once the MLflow Tracker server is setup, we can configure the MLflow CLI to communicate with it by setting the MLFLOW_TRACKING_URI environment variable. If MLflow is hosted on Databricks we would need additional environment variables to be setup (for more details check the documentation):
# Configure MLflow to communicate with a Databricks-hosted tracking server
export MLFLOW_TRACKING_URI=databricks
# Specify the workspace hostname (should begin with https://) and token
export DATABRICKS_HOST="https://<databricks-host>"
export DATABRICKS_TOKEN="xyz"
To confirm that the connection is properly setup create an experiment using the CLI with the tracking URI databricks:
# Replace <your-username> with your Databricks username
$ mlflow experiments create -n /Users/<username>/my-experiment
CI with MLflow
1- Code
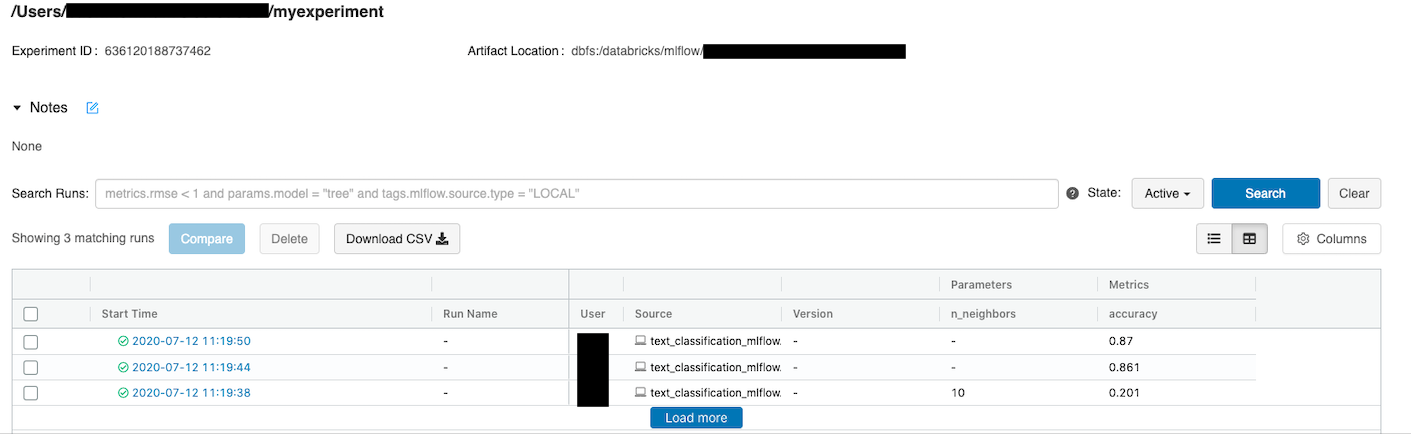
As a toy example, we will try to solve a simple Text Classification problem using the Nnewsgroups Dataset. We will write a simple solution that tries different approaches and track for each one the parameters and some metric (e.g. accuracy). For example we can track those experiments as follows text_classification_mlflow.py:
def train_model(cls, params):
  #Train model using MLFlow Context Manager
  with mlflow.start_run():
    model = cls(**params)
    model.fit(X_train, y_train)
    pred = model.predict(X_test)
    score = metrics.accuracy_score(y_test, pred)
    # MLFlow Traking
    for key in params.keys(): mlflow.log_param(key, params[key])
    mlflow.log_metric("accuracy", score)
    # MLFlow Model Registery
    mlflow.sklearn.log_model(model, "model")

for i in range(len(models)):
  train_model(models[i], params[i])
2- Build
Upon the code is pushed a trigger will launch a build process that will kick the training. Example, after instance the dependencies, we call:
$ python text_classification_mlflow.py -e /Users/<username>/myexperiment
INFO: '/Users/<username>/myexperiment' does not exist. Creating a new experiment
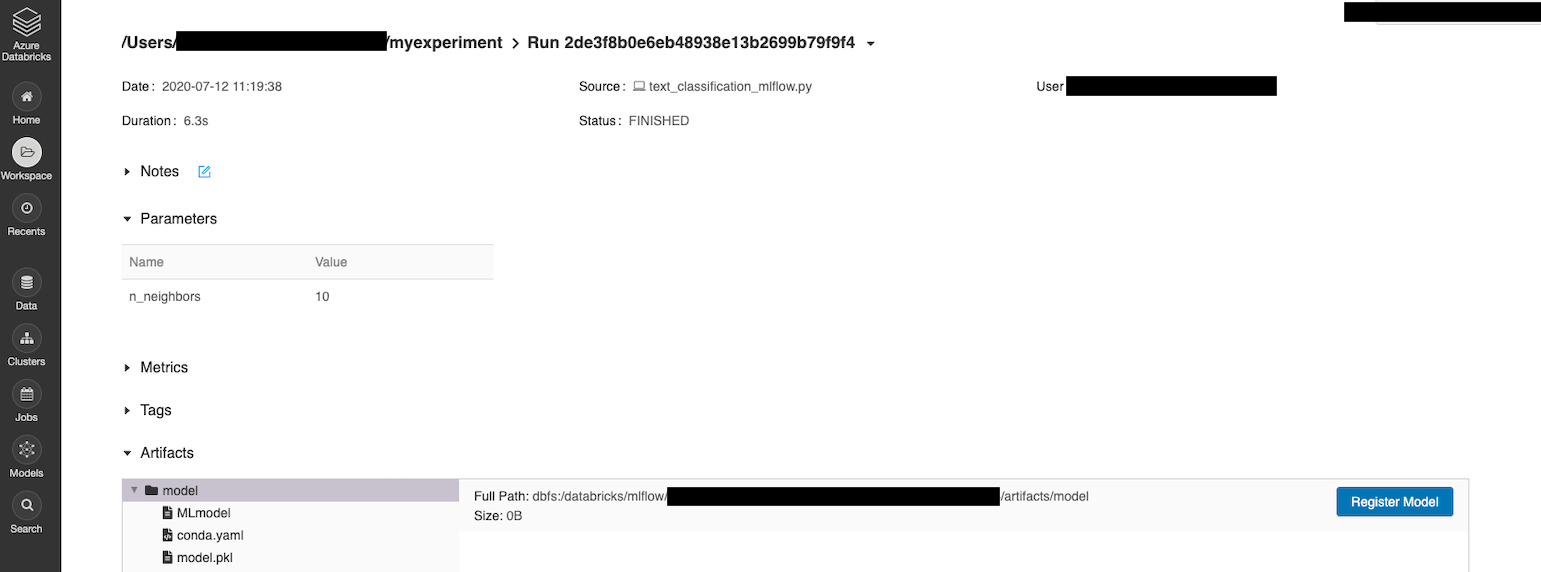
The training will be tracked on MLflow and would look like this:
3- Release
After new models have been trained in the feature branch, the next step of the CI process would be to be to pick the best model and promote it to Production. The following snippets uses MLflow API to find the best run:
from mlflow.tracking.client import MlflowClient
from mlflow.entities import ViewType

client = MlflowClient()
# Parametrizing the right experiment path using widgets
experiment_name = 'Default'
experiment = client.get_experiment_by_name(experiment_name)
experiment_ids = [experiment.experiment_id]
print("Experiment IDs:", experiment_ids)

# Setting the decision criteria for a best run
query = "metrics.accuracy > 0.8"
runs = client.search_runs(experiment_ids, query, ViewType.ALL)

# Searching throught filtered runs to identify the best_run and build the model URI to programmatically reference later
accuracy_high = None
best_run = None
for run in runs:
  if (accuracy_high == None or run.data.metrics['accuracy'] > accuracy_high):
    accuracy_high = run.data.metrics['accuracy']
    best_run = run
run_id = best_run.info.run_id
print('Highest Accuracy: ', accuracy_high)
print('Run ID: ', run_id)

model_uri = "runs:/" + run_id + "/model"
Once the best run has been identified, we can use Model Registry to track the flow of the models in and out of production.
Note that the stages (e.g. Production) defined in the registry do not directly translate to environments
The following snippet register the new model, archive the current model out of production and finally promote best run to production stage as a new version.
import time

# Check if model is already registered
model_name = "News Classification Model"
try:
  registered_model = client.get_registered_model(model_name)
except:
  registered_model = client.create_registered_model(model_name)

# Create the model source
model_source = f"{best_run.info.artifact_uri}/model"
print(model_source)

# Archive old production model
max_version = 0
for mv in client.search_model_versions("name='Diabetes Progression Model'"):
  current_version = int(dict(mv)['version'])
  if current_version > max_version:
    max_version = current_version
  if dict(mv)['current_stage'] == 'Production':
    version = dict(mv)['version']
    client.transition_model_version_stage(model_name, version, stage='Archived')

# Create a new version for this model with best metric (accuracy)
client.create_model_version(model_name, model_source, run_id)
# Check the status of the created model version (it has to be READY)
status = None
while status != 'READY':
  for mv in client.search_model_versions(f"run_id='{run_id}'"):
    status = mv.status if int(mv.version)==max_version + 1 else status
  time.sleep(5)

# Promote the model version to production stage
client.transition_model_version_stage(model_name, max_version + 1, stage='Production')
We could automate this logic and putting it together in a CI pipepline, an exaple run would look like:
$ python mlflow_promote_best_model.py -e /Users/<username>/myexperiment -m 'NewsGroup'
Experiment IDs: ['636120188737462']
Highest Accuracy:  0.8702290076335878
Run ID:  b1b4dffef5fe49f587a05dd397743e82
Model URI:  runs:/b1b4dffef5fe49f587a05dd397743e82/model
Model source:  dbfs:/databricks/mlflow/<databricks-id>/artifacts/model
Archiving model name=NewsGroup version=3 run_id=2ffa11c6f5d649f2995a30025fd181f5 current_stage="Production"
After few moments you will see that a new version with the model with higher accurracy is promoted to ‘Production’ stage on MLflow UI.

Next steps would be to put this together as github actions for instance.